How to Make an Air Dry Clay Elephant Pencil Topper
Air dry clay is a versatile and user-friendly medium for creating various crafts. In this blog post, we will guide you through the process of making a cute elephant pencil topper using air dry clay. Additionally, we will explore the benefits of air dry clay crafts for kids and their overall development. We also attached video that brings the tutorial to life, providing visual guidance and inspiration.
What is Air Dry Clay?
Air dry clay is a type of clay that hardens naturally without the need for baking in an oven. It is composed of natural materials such as clay, minerals, and water, making it safe and non-toxic. Air dry clay is available in various colors and is suitable for both kids and adults.
The Importance of Air Dry Clay Crafts for Kids
Air dry clay crafts offer numerous benefits, encouraging the development of important skills in children:
✔️Fine Motor Skills: Working with air dry clay promotes the development of fine motor skills as kids mold and shape the clay with their hands and fingers.
✔️Creativity and Imagination: Clay crafts allow children to explore their creativity and imagination. They can experiment with different shapes, sizes, and designs, enhancing their artistic abilities.
✔️Problem-solving Skills: While working with air dry clay, children have the opportunity to solve problems and overcome challenges. They learn to think critically and find solutions to make their ideas come to life.
✔️Sensory Stimulation: The tactile nature of clay engages multiple senses, providing sensory stimulation and aiding in sensory development.
Patience and Persistence: As the clay dries naturally, kids learn the value of patience and persistence, understanding that good things require time and effort.
Please note that some of the links provided in this article may be affiliate links. If you make a purchase using these links, we may receive a small commission, with no additional charge to you.
Materials You’ll Need:
Air dry clay (blue,light pink, red, and black) and clay tools
Varnish (optional)
Step-by-Step Tutorial:
Step 1: Preparing the Work Area
To ensure a smooth and clean workspace, cover your surface with a silicone mat or a similar smooth material. This will prevent the clay from sticking to your table or countertop, creating an ideal work environment.
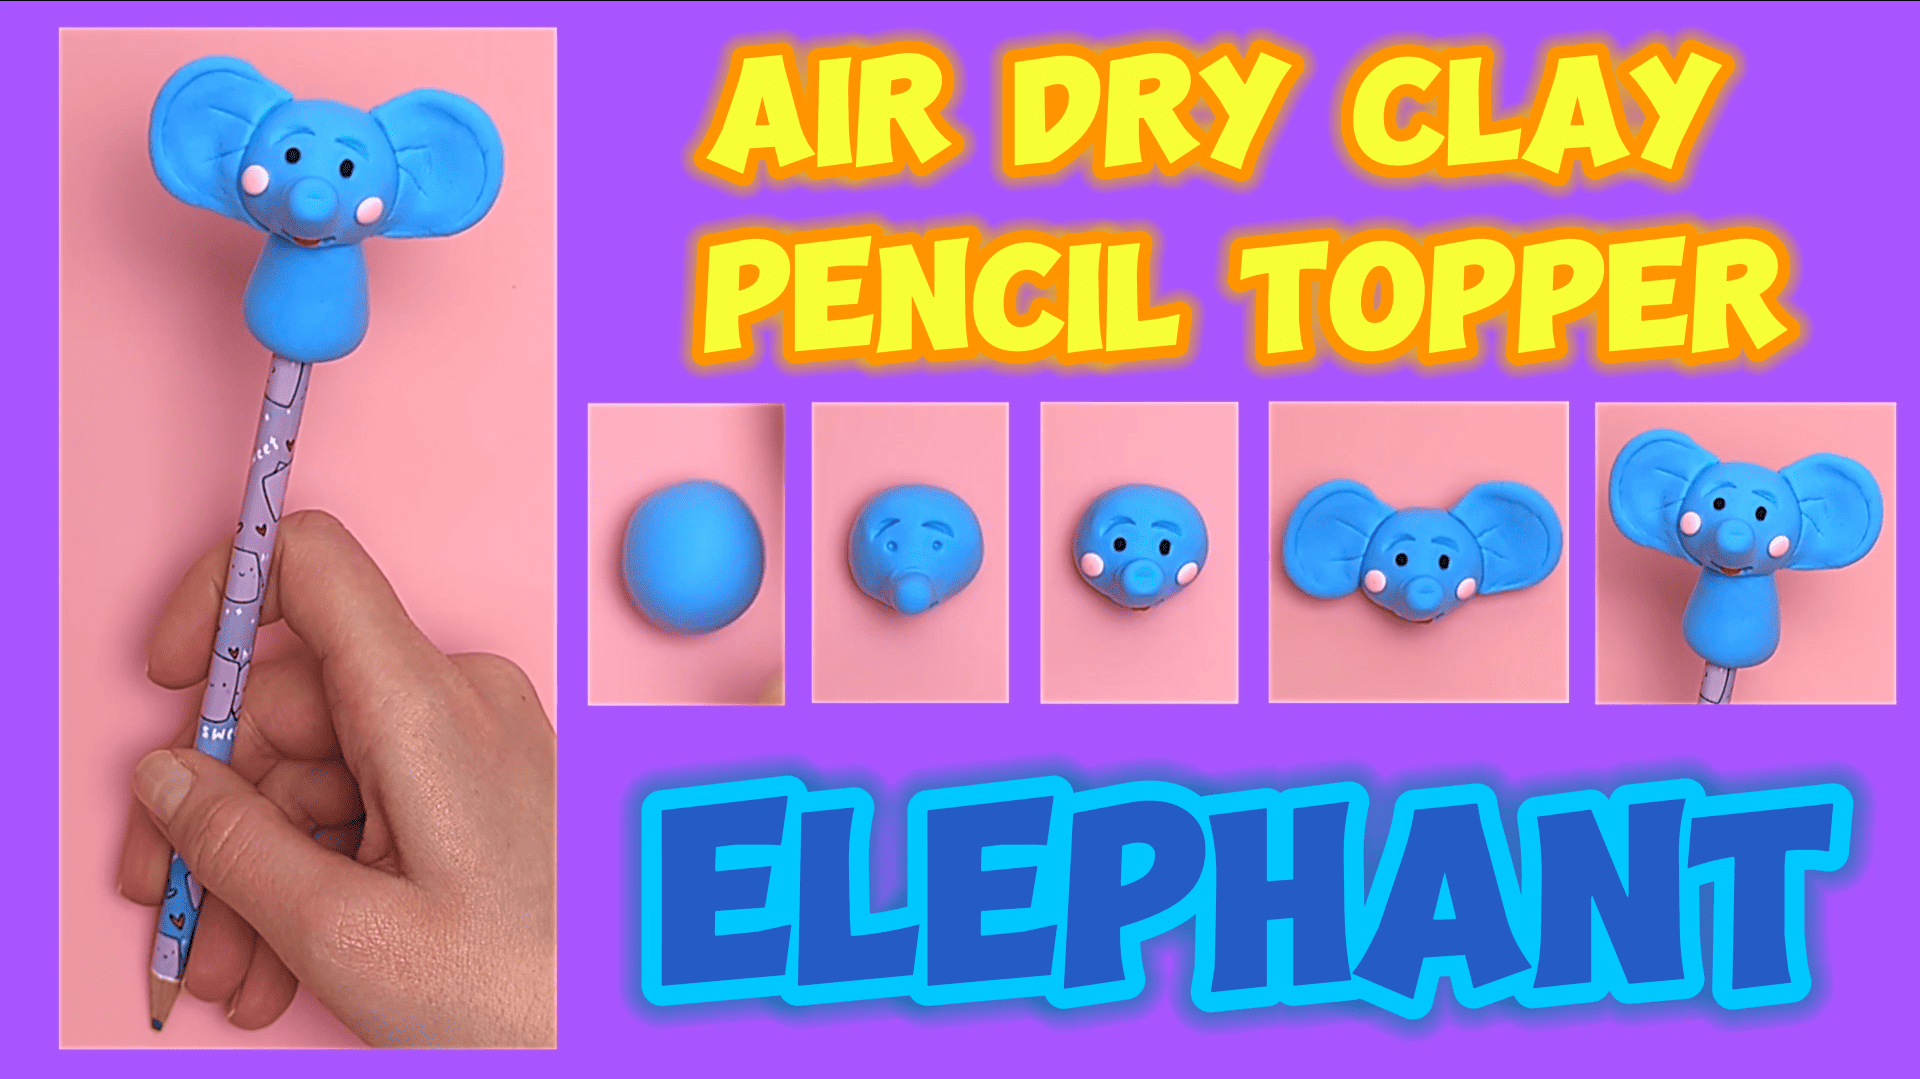
Step 2: Shaping the Elephant’s Head
Take a small piece of blue clay and roll it into a ball. This will serve as the foundation for the elephant’s head. Next, shape the trunk on one side of the ball, paying close attention to details and proportions.
Step 3: Adding Delicate Features
Now, it’s time to bring your elephant to life by adding adorable features. Using a specialized tool or toothpicks, create small indents for the mouth and eyes. Take small portions of black clay and roll them into tiny balls, delicately pressing them onto the head to create eyes. Enhance the elephant’s mouth with a small, flat, round shape of red clay for the tongue. To add extra charm, use light pink clay to create rosy cheeks.
Step 4: Crafting the Ears
Take another piece of blue clay and mold it into two large, rounded ears. Attach these ears to the sides of the head, applying gentle pressure to ensure a secure bond between the pieces.
Step 5: Shaping the Body
Using a separate piece of blue clay, roll it gently between your fingers until it becomes a smooth cylinder. This will form the body of your elephant. With precision, attach the head to the body by gently pressing the two pieces together. Smooth out any visible seams using your fingers or a tool.
Step 6: Securing with a Pencil
Finally, carefully insert a pencil into the body of your elephant, ensuring it fits snugly. Adjust the neck and head if needed.
Optional:
Step 7: Allow the clay to dry completely. The drying time may vary depending on the thickness, but it typically takes 24-48 hours.
Once dry, the elephant topper can be painted using acrylic paints and if you’d like to you can seal your creation with varnish for added durability.
Conclusion:
Creating an air dry clay elephant pencil topper is a fun and educational activity for kids. By engaging in air dry clay crafts, children can develop essential skills such as fine motor skills, creativity, problem-solving, sensory stimulation, patience, and persistence. So, gather your materials, unleash your creativity, and enjoy the rewards of working with air dry clay!